Motion-Design
Comment créer un effet parallaxe facilement avec After-Effects
Vous voulez donner vie à une photo en ajoutant un mouvement de caméra? Adobe After-Effects vous permet de créer facilement un effet de parallaxe. Découvrez la technique professionnelle de Cameron (Motion Science). Il explique comment faire la différence avec l’effet de « Compensation Optique ».

Retrouvez ci-dessous la retranscription des conseils donnés dans la vidéo.
« Hey everyone this is Cameron with motion science and I am back today with another tip / trick for motion design and this one has to do with parallaxing.
Now if you haven’t already checked out my course on parallaxing, it’s called beyond the parallax effect. It’s at motion science TV and it really dives deep into what you can accomplish with the parallax effect.
It goes beyond some of the typical things you’ve probably seen on the Internet.
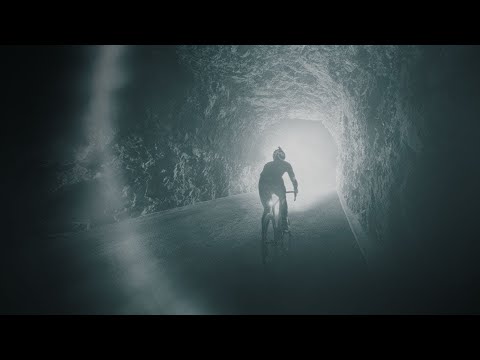
So I was approached by a client to create a interesting shot out of a photograph with this biker going through a tunnel and I thought well hey what better way to create an interesting shot with a photograph than to use parallaxing !
So what I came up with is this shot right here and if you look at the shot it looks like this guy is riding a bike through a tunnel and that the tunnel is moving past the camera.
So that’s what I wanted to show you today is how I created this effect using a really simple technique inside of After Effects but you can use it with new core or whatever motion design program you’re using.
Step 1 : Photoshop
So what I did is I started with the photograph in Photoshop. I’m not going to dive in here to what the process is to cut out an image but essentially I started with this original image.
I duplicated the layer.
I created a tunnel where I painted out the biker and I duplicate the original layer again and I isolated the biker with a mask so the two layers.
I’m going to use are the tunnel and the biker.
Step 2 : After-Effects
So once I’ve got those all layered up in Photoshop I jump into After Effects and I bring those layers into a composition which is right here.
Now one of the first things I’m going to do is if i zoom in here you can see that the bottom and the bike has been feathered off and that’s because I added a mask.
But you can see right there without the mask it just created a hard kind of weird edge as I could have fixed this in Photoshop but anyways, I wanted to mask this off and make it kind of blend better better into the background. So okay !
Next thing I did is I took the background layer and I positioned it back in Z space obviously these are 3D layers.
I positioned it back to thousand pixels which doesn’t look like a lot but we don’t need a lot of parallaxing to sell the effect here, I also scaled it up just slightly so there you go.
It’s back in Z space by two thousand pixels but it’s scaled up to 112 percent.
It essentially looks like the same photograph that we originally started with but there is some Z separation here.
The next thing I’m going to do before I add any type of camera is, I’m going to take the biker and I’m going to keyframe the position of the biker.
I’m going to set a keyframe here move to the end of my timeline and most of the time you think a biker is moving forward well when I did the shot.
I can’t remember the actual reasoning behind it, but I found that moving the biker back slightly actually made the effect look cooler.
It’s all by my look here so I’m gonna move him back in space just by about hot on those 650 pixels or, so actually I want to do more than that.
I’m also gonna skim to the left just slightly, so there you go and we can kind of follow this line here, you can see this light and dark grey zoom in, that could be our line of perspective so if at 0 we’ve got this much space between this line and the tire if I go to the end here you can see well he’s too far to the left, It’s gonna be slightly to the right.
It’s not perfect but it’s by I here and so let’s remove them there. Yeah cool !
Ok so what I did was I brought that pre-comp into another composition which you see right here.
I’m going to scale this composition down to about 25% the photo that I was provided to me was huge and a lot of times I work with the original size of the image in case the the guy who did the touch-up on the photography sends me an updated version I can easily update that layer in Photoshop and there’s not a scaling issue going on I’d rather scale the full-size image down in After Effects and work with it that way.
Now there are some drawbacks to that After Effects a lot of times has issues working with really High Res files it slows down your renders your slows down your your previews but I just prefer to work that way.
Step 3 : Camera
So anyway, so the image is scaled down now and I’m gonna add a Camera (go to layer > new > camera ) and got my presets here but I’m gonna stick with thirty five-millimeter, no depth of field is needed for this particular shot.
And I’m gonna set a keyframe here, and I’m gonna go to the end of the timeline, and you saw there that the biker moves back in space.
And I’m gonna go ahead and push the camera forward just a little bit probably somewhere in here.
So the bikers moving backwards, but the camera is moving forward. So let me preview this.
Okay ! So here we can see what it’s like by animating the biker and the pre-comp and adding a slight camera move to the shot.
We’ve created parallax but it’s still not where I want it to be.
Step 4: The « Optics Compensation » effect
So the next trick and this is the cool parallaxing trick is to use an effect under distort called « Optics Compensation » and I’ve applied this to the pre pre-comp spike layer.
And what I’m gonna do here is I’m gonna go to the beginning.
I’m gonna set a keyframe.
I’m gonna go ahead and turn this up.
I’m gonna set it to 50, and the trick here is to hit reverse lens distortion.
And I’ll show you what you see how that it see how the background came at us when I click that see that that’s what reverse lens distortion does that’s how it kind of like it turns the turns the parallax effect online.
I’m also gonna set the view center so that it’s not centered in the screen but it’s centered a little bit more maybe down in here.
You can see how that affects the image but anyways we’re gonna go to the end of the timeline and we’re going to set another keyframe, to 125, and just see that see how it stretches this is with the effect, and without, with, without. So let me show you a preview of this.
So there we go there’s the enhanced parallax effect by simply adding the optics compensation distortion filter, and one other quick thing you’ll see right at the end of this that the mountain tunnel here looks a little you know too stretched for my taste right at the end.
So what we can do is we can add a new > solid, let’s make it black and then we’ll go to the effect and we’ll go to stylize CC vignette and we’ll make this solid a an adjustment layer.
And we’ll just increase the vignette so if I turn the adjustment layer off you can see sides there, I’ll just drag the center point of the vignette to the right maybe up a little bit and I’ll increase the amount.
So there so now you can’t see the sides when it stretches too far out and there we go that’s optics compensation to create the parallax effect. So until next time, I’m Cameron and this is Motion Science. »
Retrouvez Cameron sur son excellente chaîne YouTube : Motion-Science